↓
 

Travels with George and Marta

Journeys in the Botanical World

Travels with George and Marta
  • Home
  • About
  • Travels
    • Australia
      • Perth
      • Midwest of Western Australia
      • Kalbarri to Narrogin
      • The Great Southern Region and Albany
      • Margaret River
      • Sydney
    • Borneo
      • Kota Kinabalu
      • Nepenthes at Mesilau
      • Rafflesia at Poring Hot Springs
      • Danum – Borneo Lodge
      • Kuching
      • Bako
    • California
      • Anza Borrego – March 2006
      • Los Angeles Gardens April 2008
    • Chile
      • Chile Santiago
      • Chile Atacama
      • Chile Lake District
      • Chile Patagonia
    • Namibia
      • Waterburg and Etosha
      • Etosha and Erongo
      • Welwitschia and Sossusvlei
    • South Africa
      • Kirstenbosch Gardens
      • Bushmans Kloof – Part 1
      • Bushmans Kloof – Part 2
      • Springbok
      • Richtersveld
      • Nieuwoudtville
      • Cape Town Part 1
      • Cape Town Part 2
Home - Page 61 << 1 2 … 59 60 61 62 63 … 100 101 >>

Post navigation

← Older posts
Newer posts →

Sunday SlowSoupers #2 – Mexican Shrimp Soup

Travels with George and Marta Posted on December 5, 2008 by MartaDecember 5, 2008

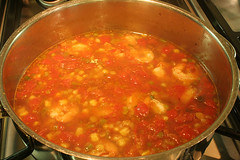
Mexican Shrimp Soup

It is week 2 of the Sunday Slow Soupers. A group soup cook-a-long on Slow Travel. This week’s host is Jerry from Jerry’s Thoughts, Musings and Rants.

Jerry’s original recipe originally called for turkey and turkey broth. We went out of town and shared Thanksgiving with our good friends in San Francisco. I didn’t have left over turkey. Plus G doesn’t eat meat. The soup sounded wonderful – roasted corn and tomatoes spiced with smokey chiles and accented with avocado. But what could I use instead of turkey? Shrimp!

Shrimp pairs well with corn, avocado and lime. I thought it would work. And it did.

I used about a dozen medium prawns instead of the 3/4 cup of turkey and vegetable broth instead of turkey broth. George’s first words – “Ooh… this is good!”.

Mexican Shrimp Soup
(Serves 4)

Ingredients
1-1/2 cups fresh corn niblets (frozen will work but thaw first)
1 pint cherry tomatoes
1 tsp vegetable oil
1/2 cup chopped green onions, white and light-green parts only; reserve dark-green ends to garnish
2 tsp minced garlic
1 tsp finely chopped, canned chipotle peppers
4 cups vegetable broth
12 shelled and deveined medium prawns (save shells)
1 ripe avocado
2 limes
2 tbsp mayonnaise
2 tbsp finely chopped, fresh cilantro

Instructions

Heat stock and shrimp shells over med-high heat and bring to a boil. Remove shells.

In a large pot, dry-roast corn over high heat until lightly charred. Set aside in a small bowl. Repeat process with tomatoes. (note: watch the corn – the sugar will burn the pan easily).
Using same pot, saute onion, garlic and chipotle peppers in vegetable oil over medium heat. Add stock and bring almost to a boil then reduce heat to simmer.

Roughly chop tomatoes and add (with juices) to pot along with corn. Add prawns and cook until the prawns turn pink and are firm. Season with salt and pepper.

In a small bowl, mash avocado with a fork. Mix in juice from 1/2 of one lime and mayonnaise. Stir in chopped cilantro and season with salt and pepper.

Serve soup topped with avocado cream, finely chopped dark-green onions and a wedge of lime.

NOTE: Jerry roasts the cherry tomatoes in the oven for about 20 – 30 minutes at 350 rather than pan roast them. I think that might be easier in the future.

Mexican Shrimp Soup Mexican Shrimp Soup

Posted in Cooking | Tagged Soups | 4 Replies

PhotoHunt: Metal

Travels with George and Marta Posted on November 29, 2008 by MartaNovember 29, 2008

EMP Museum Seattle

This week’s photo hunt is Metal. Here is a shot of two metal Seattle landmarks – the Space Needle and the Experience Music Project (EMP). The EMP is an amazing building. It was designed by Frank Gehry and it is clad in metal.

Here are a couple other shots of the metal exterior.


EMP Museum Seattle

Sky Window where the monorail passes through the building.

EMP Museum Seattle
Entrance

Posted in Miscellaneous | Tagged Photohunt | 12 Replies

Sugar and Spice Pumpkin Pie

Travels with George and Marta Posted on November 26, 2008 by MartaNovember 26, 2008

Pumpkin Pie

I love pumpkin pie. It was one of the first things I learned to bake. My mother had an old recipe book from the 20’s with a recipe that she always made. It pass down over the years and I’ve continued to make it. Pumpkin pie is rather straightforward custard pie. Pumpkin, cream, eggs, sugar and spices. What could be easier?

The hard part has always been the crust. I’ve had a standard crust that I’ve made over the years that used Crisco. Tried and True – never fails. But as I learned more about trans fats and how Crisco is made, I’ve been trying to learn how to make a crust using butter.

This year I tried the Sugar and Spice Pumpkin Pie from November 2008 issue of Fine Cooking. Instead of baking crust with the pumpkin filling, it bakes the pie crust first and then bakes the pumpkin at a low temperature. This makes much more sense. Typically my pie dough ends up soft and tough. The filling is over done.

The dough went together like a dream. It uses a lot of fat so it was easy to work with. It takes a little time and planning since it involves several chilling but it seemed worth while. I haven’t tasted it. I will be taking it to friends for dinner tomorrow. But it smells wonderful. Happy Thanksgiving everyone.

For the Crust:
1/2 tsp salt
1 1/2 cups flours
10 tbs cold unsalted butter cut into 1 inch pieces

For the Filling
15 ox can pumpkin
2 eggs
1 egg yolk
1 cup heavy cream
1 tbs brandy
3/4 cup lightly packed light brown sugar
1 tsp ground ginger
1 1/2 tsp cinnamon
1/2 tsp salt
1/8 tsp nutmeg
1/8 tsp black pepper
1/8 tsp ground cloves


Pumpkin Pie Pumpkin Pie

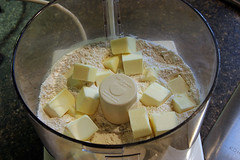
Dissolve salt in 1/3 cup very cold water. Put the flour in a food processor and put the butter on top. Pulse until mixture forms large crumbs – about 8 pulses. Add the water and pulse until the dough comes together in large clumps. Shape the dough into 1 inch thick disk, wrap in plastic and chill for 1 hour.

On a lightly floured surface, roll the dough into a circle. Transfer to a 9-inch pie plate, easing the dough into pie plate and pressing into place. Trim to a 1/2 inch overhang of dough and crimp

Heat oven to 400. Line pie shell with parchment and fill with dried beans. Bake until the sides have just set and look dry. 16-20 minutes. Remove the parchment and weights and bake until the edges are light gold and bottom is pale and dry. about 5 minutes. Remove and cool before filling.

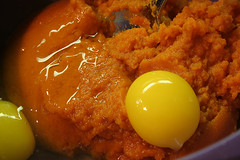
Turn oven down to 325 degrees. Whisk the pumpkin, eggs, cream and brandy. Mix the brown sugar and spices together in a small bowl and add to pumpkin mixture.

Pour into cooled piecrust and bake until set around outside – about 1 hour . Top with whipped cream.

Posted in Cooking | Tagged Cooking, Dessert | 2 Replies

Goan Curried Fish Stew

Travels with George and Marta Posted on November 25, 2008 by MartaDecember 27, 2014

I mentioned this dish last week during a chat on Slow Travel. I’ve made this several times. I takes a little preparation but goes together well. I’ve never made it exactly as it written. I’ve cut it in half once or twice since there are only two of us. I’ve also used 1/2 the fish but made all of the sauce because I like to have the sauce with rice.

I’ve found it does come out a little thin especially when I’ve only used 1/2 the fish. I don’t use the full amount of chili peppers – I usually only use 1 and it is not very hot. I also don’t use all the cumin because I don’t like cumin. Use any type of white fish or shellfish (prawns, squid, etc). Serves 4. I like it with jasmine rice.

Goan Curried Fish Stew
from Food and Wine

2 pounds sole fillets, cut into 1-inch pieces
1/4 cup lemon juice
1 1/4 teaspoons salt
2 cloves garlic, smashed
4 teaspoons chopped fresh ginger
1 cup unsweetened coconut milk
1 tablespoon ground coriander
1 teaspoon ground cumin
1 teaspoon brown sugar
1/2 teaspoon fresh-ground black pepper
1/4 teaspoon turmeric
1/8 teaspoon cayenne
3 tablespoons cooking oil
1 onion, chopped
1 tomato, chopped
4 jalapeno peppers, seeds and ribs removed, minced
3/4 cup water

1. In a glass or stainless-steel container, combine the sole, lemon juice, and 1/2 teaspoon of the salt. Let marinate at least 10 minutes.

2. In a blender, puree the garlic and ginger with the coconut milk, coriander, cumin, brown sugar, black pepper, turmeric, and cayenne.

3. In a large saucepan, heat the oil over moderate heat. Add the onion; cook, stirring occasionally, until golden, about 5 minutes. Add the tomato and cook, stirring occasionally, until soft, about 5 minutes. Add the coconut mixture, the jalapenos, the water, and the remaining 3/4 teaspoon salt and bring slowly almost to a simmer, stirring frequently.

4. Add the fish and 1 tablespoon of the marinade. Bring to a simmer and continue simmering until the fish is just done, 1 to 2 minutes.

If you like this also check out :
Yellow Fish Curry

Posted in Cooking | Tagged AsianCooking, Cooking | Leave a reply

Butternut Squash Leek Filo

Travels with George and Marta Posted on November 24, 2008 by MartaNovember 24, 2008


Butternut Squash Leek Filo

A couple of weeks ago, I made a mushroom leek filo for a pre-Thanksgiving get together. I had a half package of filo left. What to do? I also had a butternut squash and a big package of Gruyere cheese that I picked up at Costco.

I had been looking at making Butternut turnovers from Anne Sommerville’s “Fields of Greens” but it used a yeasted tart dough instead of filo. Hmmm…. I decided to combine the two recipes and instead of doing turnovers, layer the butternut squash in the filo similar to the other recipe.

I also wanted to make it a little bit smaller since there are only two of us. The mushroom filo dish makes 9×13 which is good for a crowd but a little bit much for just two of us (even for two days). I decided instead to make it in a 8×8 square pan and lay the filo up the side so it would essentially be a square pie. It worked perfect. And it was great with the porcini-chestnut soup and a salad with a mix of bitter and leaf lettuces. Perfect for fall.


Butternut Squash Leek Filo Butternut Squash Leek Filo

Butternut Squash Leek Filo
4 servings

5 garlic cloves, finely chopped
2 tablespoon olive oil
1 1/2 pounds butternut squash, peeled, seeded and cut into 1/2 inch cubes about 3 cups
Salt and pepper
a few fresh thyme springs
2 large leeks, white parts only, cut in half lengthwise, thinly sliced about 3 cups
1/2 tsp dried thyme
1/4 cup dry white wine
1 tablespoon chopped fresh thyme (I used only 1 tsp or so)
2 ounces Gruyere cheese, grated about 3/4 cup
1/4 cup Parmesan cheese, grated

16 frozen filo pastry dough sheets
4-6 tablespoon unsalted butter

Remove the filo pastry from the freezer and let it come to room temperature while you make the filling. Preheat the oven to 375 degrees F.

Combine 2 cloves of chopped garlic with 1 tablespoon of the oil. Place the cubed squash in a baking dish and toss with the garlic oil, 1/2 tsp salt, and a few pinches of pepper. add the thyme springs, cover and bake until the squash is tender but still holds its shape 25-30 minutes. Remove the thyme sprigs.

Heat the remaining tablespoon of oil in a large skillet; add the leeks, 1/2 tsp salt, a few pinches of pepper and the dried thyme. Saute over medium heat for about 2 minutes until the leeks begin to soften. Add the remaining garlic and cover the pan, allowing the leeks to steam. When tender, after about 8 minutes, add the wine and cook until the pan is nearly dry.

Gently toss the squash and leeks together with the fresh thyme. Season with salt and pepper to taste.

Melt butter in a small pan. Unfold the dough and cover with a damp towel to keep it from becoming dry and brittle. Butter the bottom of 8×8 pan. Lay down a piece of filo centering on the pan and letting it over lap evenly on opposite sides. Brush lightly with butter. Lay a second piece of filo evenly on the opposite side letting it overlap. (90 degrees to the first piece). It will be making a cross. Brush lightly with butter. Continue laying filo, brush with butter, lay alternate and brush with butter until you have used 8 pieces of filo.

Spread the squash and leek mixture over the filo and spread evenly. Sprinkle cheese over squash. Fold the filo hanging over the sides back over the filling. You will end up with a square of uncovered filing. Brush the top of the filo with butter.

Lay a piece of filo over the top of the filling. Some of the filo will be hanging over the side. That is fine – you will cut it off before baking. Brush with butter and lay another piece over the top. Continue brushing and laying the filo until you have laid 8 pieces of filo. Trim the sides.

Bake at 375 for 30-35 minutes until golden. Let sit a few minutes and cut. It might be easier to cut before baking but it wasn’t too bad since you only need to cut it into 4 pieces.

Tips: I found it worked better in a metal pan than a glass pan. Make certain that you brush the bottom of the pan well with butter.

Posted in Cooking | Tagged Cooking, VegetarianCooking | Leave a reply

Sunday SlowSoupers – Porcini and Chestnut Soup

Travels with George and Marta Posted on November 23, 2008 by MartaNovember 13, 2014


Porcini and Chestnut Soup

We are starting new group cook-a-long on Slow Travel. Previously we baked from Dolce Italiano and made ice cream from The Perfect Scoop. This time we are making soup. Our group is called the Sunday Slow Soupers.

href="http://www.slowtrav.com/blog/khb/">Logo by KHB

Logo by KHB

The first soup was selected by Amy at Destination Anywhere . It was a perfect and just in time for Thanksgiving.

It was very easy to make. The hardest thing is to find and prepare the chestnuts. I lucked out and had a package of freeze dried chestnuts that I had purchased at Pasta and Company here in Seattle. They are organic Spanish chestnuts from Sierra Rica.

The soup went together in a snap. First soak dried porcini in hot water. Don’t you like the name of our local gourmet mushroom company – Fungus Among Us?

Next saute a classic mirepoix mixture – celery, carrot and onion (or in this case shallot). Add herbs and broth. Strain the mushrooms and add both the soaking broth and soaked mushroom. Oh and don’t forget the chestnuts.

Bring to a boil and simmer for 20 minutes – puree – serve. Yum! Thanks Amy for an excellent recipe.


Porcini and Chestnut Soup Porcini and Chestnut Soup

Chestnut and Porcini Soup
Serving: 6-7 cups

Ingredients:

1/3 cup dried porcinis
1 1/2 cups hot water
1 medium carrot, diced
1 celery, diced
2 large shallots or ¼ small onion, finely chopped
1 sprig each of bay leaf, thyme and parsley
2 tablespoons butter

2 cans low-sodium chicken broth (or 4 cups homemade) or vegetable broth
1 1/4 pounds coarsely chopped peeled roasted chestnuts or 8-12 ounces bottled/canned/defrosted chestnuts. You want between a cup and 1 1/2 cups chestnuts.
Fresh-ground pepper
2 tablespoons dry sherry, or white wine, or cognac

Creme fraiche or a swirl of heavy cream, for garnish
chopped parsley for garnish

1. Put porcini mushrooms and the hot water in medium bowl. Let stand until porcini mushrooms soften, about 20 minutes.

2. In a large saucepan melt butter and add carrots, celery, and shallots or onions. Saute until tender. Add herbs and chicken broth.

3. Using slotted spoon, transfer porcini mushrooms into saucepan with chicken broth. Add porcini-soaking liquid to saucepan, carefully leaving sediment behind in bowl (I like to pour it through cheesecloth) . Add chestnuts and a few grinds of pepper. Bring to boil, reduce heat cover and simmer for 20 minutes, stirring occasionally. Remove herbs before pureeing.

4. Working in batches, puree soup in a blender until smooth, then return soup to the saucepan. Or, just use an immersion blender, being careful to keep it at the bottom of the pot to avoid hot splatters. You may want to add a bit more water or stock if it’s too thick. You want a light soup, with the consistency of milk. Add Sherry, wine or cognac to taste. Bring soup to simmer, correct seasonings adding salt and pepper, to taste. Cool slightly and refrigerate. Can be prepared 2 days ahead or frozen. Re-warm over medium heat, stirring well to recombine if its separated.

Ladle soup into bowls, garnish with a spoonful of crème fraiche, or drizzle a bit of heavy cream in a spiral. Just a touch of parsley for color is nice.

Posted in Cooking | Tagged Cooking, Soups, VegetarianCooking | 3 Replies

PhotoHunt: Reflection

Travels with George and Marta Posted on November 22, 2008 by MartaNovember 22, 2008

Menton Reflection

Reflection of Garavan area of Menton

This week’s PhotoHunt theme is reflection. I love taking pictures of reflections in mirror. Here is one from a mirror for a blind corner in the Garavan area of Menton France.

Posted in Miscellaneous | Tagged Photohunt | 13 Replies

PhotoHunt: Ruin

Travels with George and Marta Posted on November 15, 2008 by MartaNovember 15, 2008

Fort Buoux
The ruins of Fort Buoux – Luberon area of France

The ruins of Fort Buoux immediately came to mind when I saw this week’s theme – ruin. I decided to not go with the action of ruining something but instead show a photo of ruins.

Fort Buoux is near Apt. It is located on a high rocky outcrop overlooking the valley below which makes it the perfect location for a fort. It had been used since the Roman times and served as a refuge in the Middle Ages. In 1660, Louis XIV ordered it destroyed and it has been abandoned every since. The coolest item was the hidden stairs which provided a secret way to escape if the fort was breached.

Here are some more photos of the ruins.


Fort Buoux

Fort Buoux
Ruins of the watchtower

Fort Buoux
The valley below

Fort Buoux
Secret escape stairs

Posted in Miscellaneous | Tagged Photohunt | 15 Replies

Snoqualmie Falls

Travels with George and Marta Posted on November 13, 2008 by MartaNovember 13, 2008

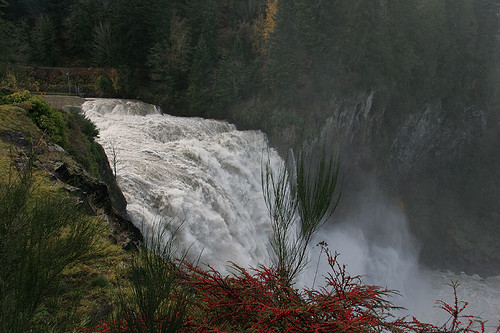
Snoqualmie Falls

November and December are the months where we get torrential rains. We call them Pineapple Express. The jet stream drops down and picks up the warm tropical weather from Hawaii and then swings up and crosses over Washington. The result is a warm heavy rain. They usually happen after we have had a little bit of snow at the passes. The freezing level rises dramatically to 8,000 or 10,000 ft and all the late fall snow melts in the mountains.

The result ranges from mild flooding in the Snoqualmie and other foothill valleys to deluges of rain which swells the rivers and tear out trails and mountain roads. The last few years have not been kind to the trails of Western Washington.

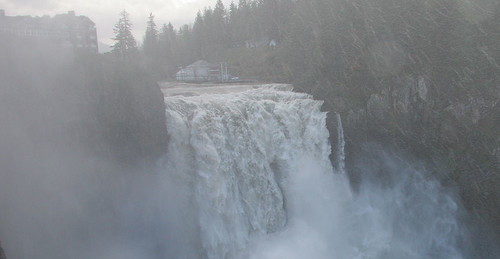
A Pineapple Express deluge came through earlier this week. The days were dark, dreary and soaked. Today, the clouds parted and the sun emerged. We drove up to Snoqualmie to check out the falls. We were not disappointed.

The falls have long been a tourist attraction in the area. They are located in eastern King Country about 25 miles east of downtown Seattle a few miles off I-90. The first tourists arrived 1855. In 1899, the switch was thrown on the generators below the falls and electricity started being generated from the falls.

In 1990, the area became the inspiration and setting for the TV series Twin Peaks. Many scenes were filmed in the area around the falls. In 1995, we spent a night in the luxurious Salish Lodge. The rooms are gorgeous as is the setting and restaurant.

The falls swell and become torrents whenever we have heavy rains and especially after a Pineapple express. We drove over to the falls today. The plus side – the falls are very full. The down side, there was a lot of mist from the tremendous amount of water. Expect to get drenched.

Here is a video that we filmed. There are some still photos following the video. If you are in the Seattle area, don’t miss a chance to view the falls.

Snoqualmie Falls
Top of the Falls

Click through for more pictures:

Continue reading →

Posted in Seattle | Tagged Washington | 4 Replies

Gnocchi

Travels with George and Marta Posted on November 10, 2008 by MartaNovember 10, 2008

Gnocchi

One of my goals has been to try to make gnocchi from scratch. We have a couple of great sources for fresh handmade gnocchi. Pasta and Company makes my favorite – light, easy to cook. Cucina Fresca also makes a pretty good one although it is harder to cook since it tends to absorb more water and gets mushy. Last week I bought some fresh at the Ballard Market and they were really tough and rubbery. I knew I could do better.

I read a couple of recipes on the web and tips on Slow Travel. I decided to make the recipe in The Best Italian Classic from Cook’s Illustrated.

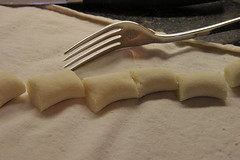
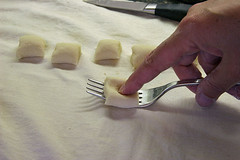
They turned out pretty good. They were a little large – each gnocchi took two bites – so next time I want to make them a little bit smaller. They definitely tasted like dumplings so I think they could be a little bit lighter. I had a little challenge figuring out how to roll them. I think the instructions on how to roll them on a fork on this Italian website better than what is in Cook’s Illustrated.

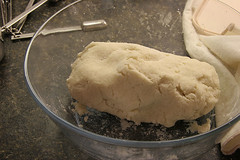
Baking the potatoes results in very dry potatoes so it is a little tricky knowing if you have enough flour. The picture below is what the dough looked like after adding 1 1/4 cups of flour. The dough rope broke up so I had to add a bit more to the dough to get it to roll correctly. I also kneaded it a bit more. I hope to do it next time without kneading it as much to make it lighter. Definitely use a potato ricer. You also want the water to be at a low boil so they cook correctly and do not break up.

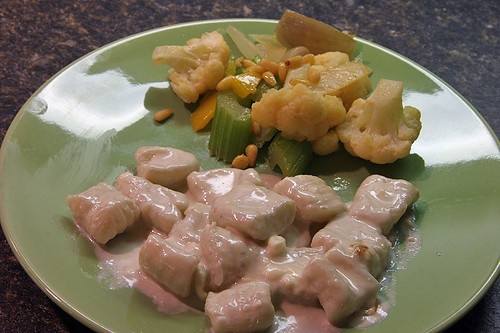
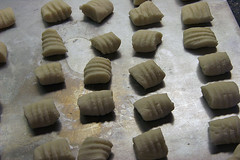
I cooked half and froze the rest. We’ll see how the frozen ones turn out next. I might also try this recipe next just to see if this one can be improved on. I sauced them with a Gorgonzola cream sauce.

Gnocchi

2 lbs russet potatoes washed
1 1/4 cups all-purpose flour, plus more as needed
salt

1. Heat the oven to 400 degrees. Bake the potatoes until done 45 minutes to 1 hour depending upon the size.

2. Hold a potato with a potholder or towel and peel. I found a paring knife works best. Put about 1/2 a potato into a potato ricer and rice the peeled potatoes into a large bowl. Cool until no longer hot, about 15 minutes.

3. Sprinkle 1 1/4 cups flour and 1 teaspoon salt over the warm potatoes. Using your hands, work the mixture into a soft smooth dough. If sticky add more flour – up to 1 1/2 cups total.

4. Pull off a small ball about the size of a tangerine and roll into a long 3/4-inch this rope. If the rope won’t hold together, return to the bowl and work in more flour.

5. Cut each rope into 3/4 inch lengths – about the size of your thumb to the first knuckle. Roll each piece on the tines of a fork pressing with your index finger. Place on baking sheet. These can be frozen at this time.

6. To Cook, Bring 4 quarts of water to a low boil in a large pot. Add salt to taste. Add about 1/3 gnocchi and cook until they float, 1 1/2 to 2 minutes. Remove with slotted spoon and sauce.


Gnocchi Gnocchi
Gnocchi Gnocchi
Gnocchi Gnocchi

Posted in Cooking | Tagged Cooking, VegetarianCooking | 3 Replies

Post navigation

← Older posts
Newer posts →

Recent Posts

  • February 2018 weather wrapup
  • Early Spring Blooms
  • Winter 2018 – Arboretum
  • Vegetable Garden 2017 #5
  • Vegetable Garden 2017 #4

Tags

"Institut de Francais" AsianCooking Australia BigIsland Birds Borneo BorneoJournal Breakfast California CaliforniaRoadtrip Camping Carnivorous Cooking Dessert EasternOregon Edmonds Fall FallMountain France Gardening Gardening Spring Hawaii Hiking Maui Memoirs NaBloPoMo Nursery Oahu Oregon Photohunt SanDiego Seattle SeattleGardens Soups Spring SSB Teanaway Tucson Turkey UrbanHike VegetableGarden VegetarianCooking Washington Wildflowers Winter

Archives

Categories

  • Africa
  • Australia
  • Borneo
  • California
  • Chile
  • Cooking
  • France
  • Gardening
  • Hawaii
  • Hiking
  • Local Sights
  • Madagascar
  • Memoirs
  • Miscellaneous
  • Mt Whitney
  • Netherlands
  • Oregon
  • Pacific Northwest
  • Seattle
  • Spring Travel
  • Travel
  • Turkey
  • Uncategorized
  • Wine
©2025 - Travels with George and Marta - Weaver Xtreme Theme
↑