
Replacing the battery in an iPod
I have a 5th generation video iPod. It has served me well for the past 4 years. I have trouble sleeping and I use it to listen to podcasts at night. I love listening to the Australian ABC Radio. The Aussie accent lulls me to sleep. I also enjoy listening to the news happening down under. It is a welcome break from war and conflicts.
I noticed a couple of months ago that my iPod was not keeping a charge. It got a charge cable and hooked it up to make it through the night but it was a pain this summer. I was doing long walks to get in shape for Hawaii and the charge would last 30 to 45 minutes at most.
There was nothing else wrong with my iPod so I started researching how to replace the battery. I also considered getting one of the new Nanos which are very cool or maybe even an iTouch but I really couldn’t justify the expense when there wasn’t anything else wrong with my iPod.
I talked to some friends. One or two had replaced the battery themselves. Most others had just bought another iPod. I looked for a service to replace it for me but most of them were $50 plus shipping.
Milliamp came up high on the google search. The comments were good on the website. They had a very helpful video on how to replace it. The kit came with all the tools and more detailed instructions. G took a look at it and felt he could do it. We went ahead and ordered the battery for only $25 with free shipping.
I got an email right away confirming the order and an email the next day that it was shipping. It arrived 3 days later. Great service. We waited until this weekend to finally replace the battery.
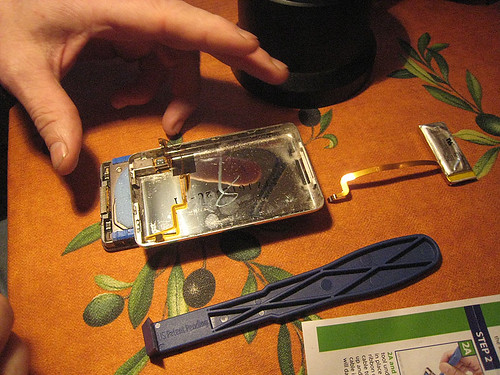
The hardest part was prying the case apart. The tool is helpful but it is really secure it takes a bit to understand exactly how to use the tool to pry it. Once it was apart, it was very simple to pop the old battery connector out, bend the new battery cable and insert it. There were two bumbers around the UBS connector and the instructions even mentioned that these may pop out. They were very easy to put back in. We removed the glue strip, aligned the battery around the earphone jack and snapped the case back together.
The moment of truth… we pressed it on and saw the Apple! Yeah! Success. We charged it and now it is good to go. The charge lasts at least 8 hours now – so much better than 20 minutes.
I would highly recommend this company. The service and instructions are great. They make it as easy as possible for novices to replace an iPod battery.
Ok, so I am sending my iPods to you to fix. 🙂
VERY cool, Marta! I am so glad to know this. I LOVE my ipod and can’t imagine doing without, but like you do not want to buy a new one if a battery is all it needs. I am saving this info for “when the time comes”. I teach high school and kids just go through these as if they were disposables. Crazy getting a new one every time a new edition is released. Apple has the market on “must have” gadgetry!
I just read on Mac Rumors that Apple is changing their screws so that it will be more difficult for people to open up their portable devices. Boo Apple!